


Introduction to React.js | Installation, JSX, and Custom Components - Day 1
Learn how react works and how you create your own components of the desired name on react to increase reusability and composability.


Reactjs is a javascript library to build front-end user interfaces. It follows the declarative approach to writing code. You can manage the state in your application and react will render a specific component when the data changes.
Reactjs uses JSX that helps to write HTML in react. JSX stands for JavaScript XML. JSX makes it easier to write and add HTML in React.
Prerequisites for Learning React.js
- HTML
- CSS
- Javascript-ES6
- Node js in your system. Click here to download.
- Code editor(VS code preferred)
Intermediate-level experience with HTML, CSS, and javascript is required if you want to learn Reactjs. You must have web dev experience with vanilla CSS and js if you want to start learning Reactjs.
Installation of starter code for React
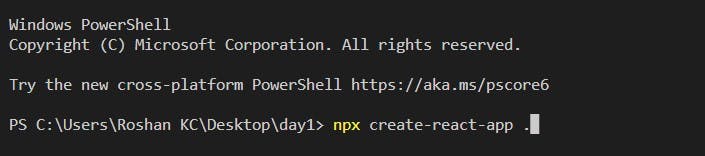
If you have node/npm in your system then you can open your preferred code editor and follow the steps given below to install react.
- Create a folder with the name of your choice and open it in the code editor. I am using VS code.
Now open a terminal in vs code. You can use the (control + ~) shortcut on windows and (command+~) on mac. The tilde sign is situated on side of the number 1 on your keyboard. Then type the following command.
If you want to create react starter code on a new folder inside the folder you then type the following command
npx create-react-app your-folder-name
- If you want to install react on the folder you are in then type the following command.
npx create-react-app .
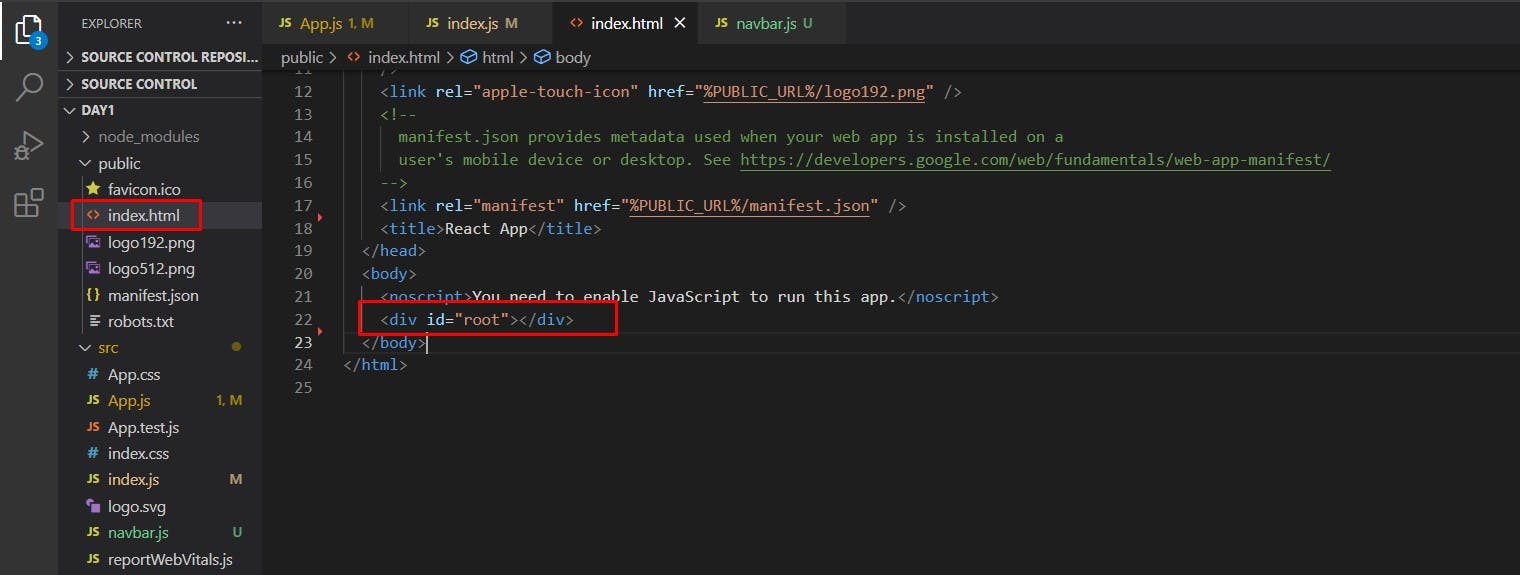
Directories and files.
Now after installation we will have some directories created on our code editor. Inside the src directory, we will see some files. This is where we will write our react code for our website. Meanwhile, the Public directory contains our images and HTML files. We edit the HTML as per our choice and there we will see div with id="root" on the body of the index.html file.
  <body>
    <noscript>You need to enable JavaScript to run this app.</noscript>
    <div id="root"></div>
  </body>
Custom Component and Reactjs code example
Inside the src directory, we will see a bunch of files. Among them, App.js and index.js are important for us as of now.
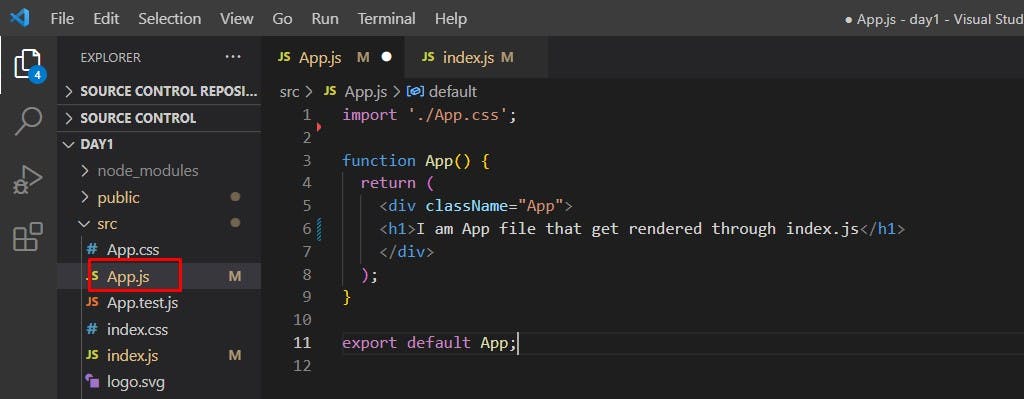
App.js will contain a function called App which is exported from there. The function is returning HTML code. HTML is written inside the App function. But it isn't completely HTML but what we called jsx. You can see a change in how you write class attributes on normal HTML but here you write className in camelCase format just like in javascript.
import './App.css';

function App() {
  return (
    <div className="App">
    <h1>I am App file that get rendered through index.js</h1>
    </div>
  );
}

export default App;
We can write HTML inside functions and return them. In fact, what is returned from the function App are just javascript objects which are imported on the index.js file. You can console.log value returned from the App function to see what we get too.
console.log(App())
We need to import React from 'react' in our file because React (which you just imported from 'react') is what defines JSX.
Here in index.js file, we see a root variable that is just using createRoot method from ReactDOM to create the root. We are selecting the div with an id called root from index.html which we had seen inside public/index.html directory. Then we are passing that div with id root to createRoot element where we will render all our reactjs codes and components. So the div with id called root on index.html file will have all our components of react inside it because we just declared it as root by passing it on ReactDOM.createRoot () method.
import React from 'react';
import ReactDOM from 'react-dom/client';
import App from './App';

const root = ReactDOM.createRoot(document.getElementById('root'));
root.render(
  <React.StrictMode>
    <App />
  </React.StrictMode>
);
You can see the root.render() method which is rendering a component called which is non other than the App function which we imported from App.js file. This is the syntax for the custom component. You write them just like a HTML component with closing syntax. In fact, what we call custom component are nonother than javascript functions like App() that returns jsx. We just call the function in the format of to get object returned by them. render() function available on root variable is what converts the javascript to HTML code understood by the browser.
Composable due to custom components
Custom components are part of our application which are represented as components. They are just function that returns a component of the website. For example if you want to create a navbar component for your website, then you can create a file called navbar.js in src directory. Then to create a custom component called navbar you need to import React from 'react'. After that you can create a function called Navbar and write your HTML inside it. Then you can export it.
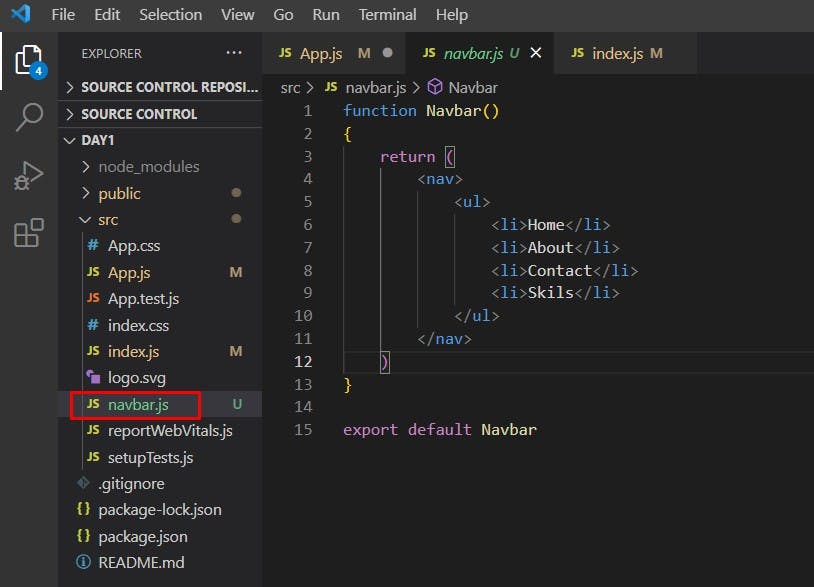
function Navbar()
{
    return (
        <nav>
            <ul>
                <li>Home</li>
                <li>About</li>
                <li>Contact</li>
                <li>Skils</li>
            </ul>
        </nav>
    )
}

export default Navbar
After that, you can import the function called Navbar on index.js file. We always capitalize first letter for our component. Now you can call the function Navbar inside root.render method below just like you called. This navbar is now a custom component that we can give any name and call on any place where we need it.
After that try to run your react app by typing the following command on the terminal.
npm start
Now you will face some errors. The reason for that error is you cannot render two components directly under the root component. You need to house them inside a parent div. Here is kept and component inside a parent div to render them. We render jsx in this format.
import React from 'react';
import ReactDOM from 'react-dom/client';
import App from './App';
import Navbar from './navbar'
const root = ReactDOM.createRoot(document.getElementById('root'));
root.render(
  <React.StrictMode>
    <div>
    <App />
    <Navbar />
    </div>
  </React.StrictMode>
);
Or you can use what we call jsx fragment i.e <></>.
import React from 'react';
import ReactDOM from 'react-dom/client';
import App from './App';
import Navbar from './navbar'
const root = ReactDOM.createRoot(document.getElementById('root'));
root.render(
  <React.StrictMode>
    <>
    <App />
    <Navbar />
    </>
  </React.StrictMode>
);
To Summarize
So we just create a component which is just a javascript function that returns jsx codes. JSX is just an extension to js syntax that helps to structure a component on react like our App and Navbar. They look familiar to HTML but are just javascript objects. So when you log output while calling a function that returns jsx, you will get object as output. You then import components from files you exported, in our case imported at index.js.
Then you select where you want to render the components. We select a div with id root and passed it to createRoot method to make it as a parent div which will hold our all components then save it as root. Inside root.render method you put which component you want to render in that div called root. In our case, we rendered App and Navbar inside that div. We can only render one component directly so, to render more than one component we need to put them inside a parent div which we did to solve the issue.
What did we learn?
- What is react and how do we create react projects?
- Directories and files we get by creating react project
- Basic syntax of react and custom components.
- Creating and using custom components.
I hope this article was helpful for you. Now you can practice creating custom components for simple components of the website like the navbar, body, footer, cards, etc, export and import them and use them on index.js file as I did. You can try this by converting a page made with HTML CSS to reactjs. Share with your friends and bye-bye till the second part where we will learn about props.